⚠️ Archived Content: This post was published in 2016 and is now considered historical documentation. Many tools and services mentioned (xctool, HockeyApp, Travis CI’s free tier) are deprecated or no longer available. The workflows described do not reflect current best practices. This is preserved for reference purposes only. For modern CI/CD approaches, consult current documentation for GitHub Actions, GitLab CI, or contemporary CI/CD platforms.
We are going to pick up where we left off in part one of this series, with our minimal setup using xctool which built our app on Travis CI.
App Signing
In the process of creating a valid .ipa package and to deploy our app to a physical device, we need to sign our app with a bunch of certificates and package it. Packaging is the process where the compiled binary, assets and meta files are bundled into an app container (.ipa) to be installed on a device. Getting the right certificates and using the right procedures to sign your binary and create your .ipa is known to be difficult. Here we’re going to explain one approach that should work for everyone.
In this first section I will cover the process of obtaining the right certificates, and using them to sign our ipa. We will create some scripts for the signing process so that our release builds can be used. There will also be a part which covers how to encrypt your certificates in case you’re on a public repository or want an additional level of security. In addition, I’m introducing the solution I came up with for a corporate setting — a certificate git repo which gets pulled from Travis so that you don’t need to store your certificates in your project’s repo.
Signing Certificates
To sign and package our app we need two certificates and a provisioning profile: The Apple WorldWide Certificate, an iPhone Distribution Certificate along with its corresponding private key, and the iOS Provisioning Profile.
1. The Apple WorldWide Certificate
You can either download it here or export it from your Keychain. Save it somewhere in your repo, and remember the location as we need the path for our signing scripts.
2. iPhone Distribution Certificate (App Store or Ad Hoc)
Now we need a distribution certificate. To get a new one, go to the Apple Developer Program Website and create one. You’ll find everything you need under ‘Certificates > Production > Add > App Store or Ad Hoc’. This gives you the option to download your iPhone Distribution Certificate.
If you’ve downloaded and installed the certificate before or if you want to use an existing one from your machine, open your Keychain Access application (Applications > Utilities > Keychain Access) and export the certificate. The naming in your keychain will most likely be like: “iOS Distribution: Company Name or Developer Name”.
 Note: Make sure that you only select the iPhone Distribution Certificate and NOT the combined certificate with the private key. A combined certificate would have a little “drop-down” arrow on the left where unfolding would show you the corresponding private key underneath. If that’s the case, unfold it and only select the certificate.
Right-Click on the certificate and choose ‘Export’. The target file format for this certificate will be ‘.cer’. You should save it at the same place where you saved the Apple WorldWide Certificate.
3. iPhone Distribution Certificate Signing Identity - Private Key
Next you need your private key. The private key normally has the name of the developer which signed for the iPhone Distribution Certificate. In our case the certificates name is ‘Aaron Hillegass’ marked as private key in the ‘kind’ column.
Go through the Export steps explained above for the iPhone Distribution Certificate. The target file format for this certificate will be ‘.p12’. Feel free to use any password you like, though keep in mind that this is all parsed through bash later, so spaces can give you a hard time later.
4. iOS Provisioning Profile
The last file we need is the iOS Provisioning Profile. You can create a Provisioning Profile at Apples Developer Program Member site. Go to ‘Provisioning Profile > Distribution > Add > Ad Hoc’ or ‘In House’ and create your profile. When creating the profile you can either set a specific Bundle Identifier so your Provisioning Profile will only work with that Identifier, or you’re going to specify an Identifier with an asterisk ‘*’ to match more than one Identifier. Save it next to your other files in your repository. It’s helpful to install this locally, but not necessary for our CI setup.
Encryption
The next step before we can finally modify our script again and sign our app, is to decide if you want to encrypt your certificates or if you want a custom solution for them. As mentioned before there are three ways to go from here.
First, you can simply store your certificates unencrypted in your repo. If so, you can skip this paragraph. Note: This is only recommended if your repo is private and you don’t fear any security breach.
Second, you can store your certificates in a special repo and pull the certificates once Travis needs them. That’s a nice setting if you have a whole bunch of apps or if you want to skip the step of acquiring the certificates every time. This works well with a provisioning profile that’s not attached to a specific bundle identifier. Plus, you can store your certificates there either encrypted or unencrypted depending on security concerns of your repository. If so, read along and apply this paragraph to a detached repo instead of this repo.
Third, you can store your certificates encrypted in your projects repo.
To start with the encryption process, I want to introduce the Travis gem, a command line tool which helps you encrypt variables and files. The Travis gem can be installed through ‘gem install Travis’ on your local machine, given ruby is present. Given we need to add the personal key to Travis’s environment when signing the app, we need to store the password you just set in step 3 when acquiring the signing identity. Travis uses the repos private ssh key to encrypt your secrets. Therefore, we want to create a variable which holds the encrypted representation of the password we used to export the signing identity.
Type in the following into your terminal. Make sure your working directory is your repositories root (‘cd myRepsitories/Repository’ with your paths first):
florian$: travis encrypt "PRIVATE_KEY_PASSWORD=YOURPASSWORD"
Please add the following to your .travis.yml file:
  secure: "S0HplSFd3pYqfxtAk8s2OAcMW8K6Cdp0UesjIZJ2PupDWEOheYqReaGVBmaMOwHICEis+yV5VYjrX3d/n3jS/A3yqO1YlfynOp3zMtHAlnH5vw7ESUc152lpU/ShqbU9ENZey0DM1dTi8CzC6OyvLXcj5E94zUD4iQ/zClQYg="
Note: Make sure to replace YOURPASSWORD with the actually password you’ve used in step three above.
This command will give you an encrypted version of your env variable, which you should add to your .travis.yml. This environment variable will be decrypted once travis runs your scripts. If you want the travis gem to add this line automatically to your configuration file, add the ‘–add’ option to the travis encrypt command. NOTE: I advice you to add it manually as the travis gem –add option will run your configuration file through a LINT verification which sometimes breaks your configuration file. This is why we didn’t use that option.
You can add this variable in your configuration file under the ’env:’ key specifying ‘global:’ visibility.
Note: Any additional variables are added the same way.
 # file: .travis.yml
language: objective-c
env:
  global:
  - secure: TifeGWADNrRjp6yjiMHPaiUEXppOlRKh04bLrkpzNzC8hIkNCQgNFBGOC5ewSvHDdK1VJLPNsjaP74lTifeGWADNrRjp6yjiMHPaiUEXppOlRKh04bLrkpzNzC8hIkNCQgNFBGOC5ewSvHDdK1VJLPNsjaP74l
The next thing we have to do is to encrypt the actual certificates. The Travis gem provides an encrypt-file option, that unfortunately doesn’t work for certain filetypes, which you will recognize once your build fails. Therefore we’re going to encrypt our files manually using openssl and a set password. We’re going to use ‘AppSigningMadness’ as our password.
Openssl is invoked on the command line like this:
openssl [cipher_type] -k [password] -in <FileToEncrypt> -out <FileEncrypted> -a
florian$: openssl aes-256-cbc -k "AppSigningMadness" -in repo/certfolder/ContinuousDistributionExample.mobileprovision -out repo/certfolder/ContinuousDistributionExample.mobileprovision.enc -a
florian$: openssl aes-256-cbc -k "AppSigningMadness" -in repo/certfolder/iOS_Distribution_Certificate.cer -out repo/certfolder/iOS_Distribution_Certificate.cer.enc -a
florian$: openssl aes-256-cbc -k "AppSigningMadness" -in repo/certfolder/private_key.p12 -out repo/certfolder/private_key.p12.enc -a
Note: Make sure to change AppSigningMadness to a password of your choice and replace the example paths here with actual paths to your certificates on your machine.
Some of you might bring up at this point that we don’t necessarily need to encrypt our Provisioning Profile and our Distribution Certificate as only the private key is what needs to be treated top secret. While this is basically true, there are cases where you don’t want to expose the UUIDs in your Provisioning Profile and you might want to hide the information in your Distribution Certificate. In addition to this, we’ve decided for the sake of this beginner tutorial to encrypt all our certificates and provisioning profiles for the sake of getting the practice and to be better safe than sorry.
We don’t have to encrypt the Apple WorldWide Certificate as it’s publicly available anyway. After openssl has finished its work, you’ll get a {Certificate}.cer.enc version, which is the encrypted version of these files. Be careful which version you’re going to check in with git as you only want to check in the encrypted version. If this info comes too late for you, you might want to check out BFG Repo-Cleaner to remove that sensitive information again.
Again we’re going to use a bash variable to store the password we used with openssl to encrypt our files. Since we don’t want to store our password in clear text, we’re encrypting it again with our travis gem.
MBP: florian$: travis encrypt "OPENSSL_PASSWORD=YOURPASSWORD"
Please add the following to your .travis.yml file:
  secure: "S0HplSFd3pYqfxtAk8s2OAcMW8K6Cdp0UesjIZJ2PupDWEOheYqReaGVBmaMOwHICEis+yV5VYjrX3d/n3jS/A3yqO1YlfynOp3zMtHAlnH5vw7ESUc152lpU/ShqbU9ENZey0DM1dTi8CzC6OyvLXcj5E94zUD4iQ/zClQYg="
Add the secure variable to your configuration file and you’re almost done with the encryption part. The last remaining part of the encryption process is actually the decryption so travis can use our certificates. Add the decryption commands to your .travis.yml in the before_install phase:
 # file: .travis.yml
before_install:
  - sudo gem install cocoapods
  - brew update
  - if brew outdated | grep -qx xctool; then brew upgrade xctool; fi
  - openssl aes-256-cbc -k "$OPENSSL_PASSWORD" -in repo/certfolder/ContinuousDistributionExample.mobileprovision.enc -d -a -out repo/certfolder/ContinuousDistributionExample.mobileprovision
  - openssl aes-256-cbc -k "$OPENSSL_PASSWORD" -in repo/certfolder/iOS_Distribution_Certificate.cer.enc -d -a -out repo/certfolder/iOS_Distribution_Certificate.cer
  - openssl aes-256-cbc -k "$OPENSSL_PASSWORD" -in repo/certfolder/private_key.p12.enc -d -a -out repo/certfolder/private_key.p12
You’re all set in terms of encryption now! The section underneath is not necessary if you store your certificates in your project’s repository (which is most likely what you want to do if this is your first Travis setup).
Using a Certificate Repo
Attention: This is an optional step that is only mentioned as an additional option if you have many apps that share the same certificates.
In case you are working at a large company or have a bunch of apps that are usually signed with the same certificates, it might be advisable to setup a reusable solution for your certificates. I use a designated repo that holds all our certificates, distribution profiles, and everything necessary for the signing process. Providing these in a private repository to developers makes their setup easier when configuring a new project. Using this certificate repository in the Travis CI lifecycle is then straightforward—you only need to run git clone when Travis needs your certificates.
All you need to do is:
Add the git clone command before you decrypt your certificates (if you store them encrypted) in the ‘before_install’ phase, and remember that by default you’re working directory is the root of your git repository. So when issuing the git clone command, make sure to choose a relative path and adjust the path to your certificates in your openssl commands then.
git clone git@github.com:User/repo.git ./ios-distribution
To access your repo in case it’s a private repo, you can either give travis a private ssh key through one of the following bash scripts, or you can add a designated ssh key in Travis’s webinterface under Settings > SSH Key (This feature is only available with a Pro plan).
Bash Scripts
To finally put all pieces of the puzzle together, we need to add a few scripts which do the hard work for us. We’re going to add four scripts in total: add-keys.sh, update-bundle.sh, ipa-signing.sh and delete-keys.sh and invoke them in our .travis.yml.
Before we start with add-keys.sh, I want to introduce a few variables to your .travis.yml so some of the logic in the following scripts makes sense. This is also a good chance if you want to do a quickstart or catch up with what we did before, as the code snippet underneath can be used to start from scratch.
Put the following into your .travis.yml file:
 # file: .travis.yml
env:
  global:
      # Set this to your Apps Name
  - APP_NAME="ContinuousDistributionExample"
      # That's your XCode Scheme's name, most likely that's the same as your App Name. *Xcode -> Product -> Scheme*
  - XCODE_SCHEME="$APP_NAME"
      # That's your XCode Unit Test Scheme's name, most likely the only difference is a Test suffix to your main scheme
  - UNIT_TEST_SCHEME="ContinuousDistributionExampleTests"
      # Fill in your iPhone Distribution Certificate name in here (not the filename, the name shown in your Keychain access). Check with QuickLook (tap space in finder on the file).
  - 'DEVELOPER_NAME="iPhone Distribution: Florian Harr"'
      # This has to change if your project is in a subfolder. Trailing slash is required for this to work
  - PROJECT_DIRECTORY="$PWD/"
      # The folder relative to your project root where your scripts are. No trailing slash here
  - SCRIPT_FOLDER="travis-scripts"
      # The folder relative to your project root where your ios-certs are. No trailing slash here. Leave this empty and specify your repo in the add script, if you did the extra step and you're using the git certificates solution.
  - CERT_FOLDER="ios-certs"
      # That's the standard location for your Info.plist where your Version Number and such things are located.
  - INFO_PLIST="$PROJECT_DIRECTORY/$APP_NAME/$APP_NAME/$APP_NAME-Info.plist"
Note: Please see the comments for what you have to fill in.
Now let’s start with the first bash script ‘add-keys.sh’. Add this script either to a specific travis-script folder that you might want to create in the repo, or to the folder you specified in the variable ‘$SCRIPT_FOLDER’.
 # file: $SCRIPT_FOLDER/add-keys.sh
 #!/bin/sh

 # Print Software Version
echo "***************************"
echo "*        Software         *"
echo "***************************"
echo "Cocoapods version is"
pods --version
echo "XCTool version is"
xctool -v

 # Create custom Keychains
echo "***************************"
echo "*        Adding Keys       *"
echo "***************************"

if [ "$CERT_FOLDER" == "" ]; then
 # Get the right certificate from GitHub
git clone git@github.com:User/repo.git ./ios-distribution
CERT_FOLDER = "ios-distribution"
fi

 # Create a custom keychain
security create-keychain -p travis ios-build.keychain

 # Make the custom keychain default, so xcodebuild will use it for signing
security default-keychain -s ios-build.keychain

 # Unlock the keychain
security unlock-keychain -p travis ios-build.keychain

 # Set keychain timeout to 1 hour for long builds
 # see http://www.egeek.me/2013/02/23/jenkins-and-xcode-user-interaction-is-not-allowed/
security set-keychain-settings -t 3600 -l ~/Library/Keychains/ios-build.keychain

 # Add certificates to keychain and allow codesign to access them
security import ./$CERT_FOLDER/AppleWorldwide.cer -k ~/Library/Keychains/ios-build.keychain -T /usr/bin/codesign
security import ./$CERT_FOLDER/iOS_Distribution_Certificate.cer -k ~/Library/Keychains/ios-build.keychain -T /usr/bin/codesign
security import ./$CERT_FOLDER/private_key.p12 -k ~/Library/Keychains/ios-build.keychain -P "$PRIVATE_KEY_PASSWORD" -T /usr/bin/codesign

 # Put the provisioning profile in place
mkdir -p ~/Library/MobileDevice/Provisioning\ Profiles
cp ./$CERT_FOLDER/Provisioning_Profile.mobileprovision ~/Library/MobileDevice/Provisioning\ Profiles/
In the script above, we’re creating a custom keychain with a lifetime of one hour, which should be enough for Travis to use the certificates. Then, we import all our certificates including the private key, using our encrypted PRIVATE_KEY_PASSWORD env variable again. Add the add-keys.sh script to your ‘before_script:’ phase in your .travis.yml by issuing ‘- ./$SCRIPT_FOLDER/add-keys.sh’.
Set the execution rights for this script by executing chmod a+x travis-scripts/add-keys.sh. *This applies to all further .sh files as well.
The next step is to sign the app, but before we do that, we have to invoke xctool to create a build for us which we can sign later on. We create a build with the ‘Release’ configuration for the iphoneos SDK and we specify a OBJROOT and SYMROOT path so we know where the binary is located at. You can add this command to your ‘script’ phase in your .travis.yml, which looks like this:
xctool -workspace $PROJECT_DIRECTORY$APP_NAME.xcworkspace -scheme $XCODE_SCHEME -sdk iphoneos -configuration Release OBJROOT=${PROJECT_DIRECTORY%/}/build SYMROOT=${PROJECT_DIRECTORY%/}/build ONLY_ACTIVE_ARCH=NO
 # ONLY_ACTIVE_ARCH=NO is a build settin we set here to make sure we build the actual app for all architectures and devices we could possibly have. You can add additional build settings at the end of this command.
Next is the ipa-signing.sh script which we’ll use to code sign our app and embed the Provisioning Profile.
 # file: $SCRIPT_FOLDER/ipa-signing.sh
 #!/bin/sh
if [[ "$TRAVIS_PULL_REQUEST" != "false" ]]; then
  echo "This is a pull request. No deployment will be done."
  exit 0
fi
if [[ "$TRAVIS_BRANCH" != "master" ]]; then
  echo "Testing on a branch other than master. No deployment will be done."
  exit 0
fi

PROVISIONING_PROFILE="$HOME/Library/MobileDevice/Provisioning Profiles/Provisioning_Profile.mobileprovision"
OUTPUTDIR="$PROJECT_DIRECTORY/build/Release-iphoneos"

echo "***************************"
echo "*        Signing          *"
echo "***************************"
xcrun -log -sdk iphoneos PackageApplication "$OUTPUTDIR/$APP_NAME.app" -o "$OUTPUTDIR/$APP_NAME.ipa" -sign "$DEVELOPER_NAME" -embed "$PROVISIONING_PROFILE"
This script is a bit heavy for now, but worth explaining. The first two if conditions are checking if you’re either on a pull request or on a branch other than master, as it is pointless to sign a build with changes which haven’t made it into master yet. After that the signing process is happening through ‘xcrun’. Make sure to change the $PROVISIONING_PROFILE (only the name of the profile, not the path) in case you named your Provisioning Profile file different from Provisioning_Profile.mobileprovision.
Chmod the ipa-signing.sh script again and add it to your .travis.yml in the ‘after_success:’ phase.
The next script is the delete-keys.sh script, which will remove our custom keychain once we’re done with our certificates.
 # file: $SCRIPT_FOLDER/delete-keys.sh
 #!/bin/sh
security delete-keychain ios-build.keychain
rm -f ~/Library/MobileDevice/Provisioning\ Profiles/Provisioning_Profile.mobileprovision
Add this script to the ‘after_script:’ phase, which will be executed whether if your build succeeded or not.
The last script we’re going to add is the update-bundle.sh script we skipped earlier.
 # file: $SCRIPT_FOLDER/update-bundle.sh
 #!/bin/sh

 # Updating Plist Information for deployment
echo "***************************"
echo "*    Updating Bundle      *"
echo "***************************"

/usr/libexec/PlistBuddy -c "Set :CFBundleVersion $TRAVIS_BUILD_NUMBER" "$INFO_PLIST"
echo "Set CFBundleVersion to $TRAVIS_BUILD_NUMBER"
This script will change our CFBundleVersion to match the current Travis Build Number. This is nice as it gives you a trackable history when we later ship the app through HockeyApp. Add this script to the ‘before_script:’ phase. Don’t forget to chmod a+x for this script as well.
With all these scripts in place, your ‘.travis.yml’ should be similar to this:
 # file: .travis.yml
before_install:
- sudo gem install cocoapods
- brew update
- if brew outdated | grep -qx xctool; then brew upgrade xctool; fi
before_script:
- ./travis-scripts/add-key.sh
- ./travis-scripts/update-bundle.sh
script:
- xctool -workspace ContinuousDistributionExample.xcworkspace -scheme ContinuousDistributionExample -sdk iphonesimulator
- xctool -workspace ContinuousDistributionExample.xcworkspace -scheme ContinuousDistributionExample -sdk iphoneos -configuration Release OBJROOT=$PWD/build SYMROOT=$PWD/build ONLY_ACTIVE_ARCH=NO
- xctool test -workspace ContinuousDistributionExample.xcworkspace -scheme ContinuousDistributionExampleTests -sdk iphonesimulator
after_success:
- ./travis-scripts/ipa-signing.sh
after_script:
- ./travis-scripts/delete-keys.sh
To summarize and make sure you have everything, your scripts folder should contain the following:
- add-keys.sh
- update-bundle.sh
- ipa-signing.sh
- delete-keys.sh
Adjusting your XCode Project Settings
Now it might seems that you’re done at this point, but unfortunately there are two small options and a ‘glitch’ in the tooling that keeps us from completing the code signing process.
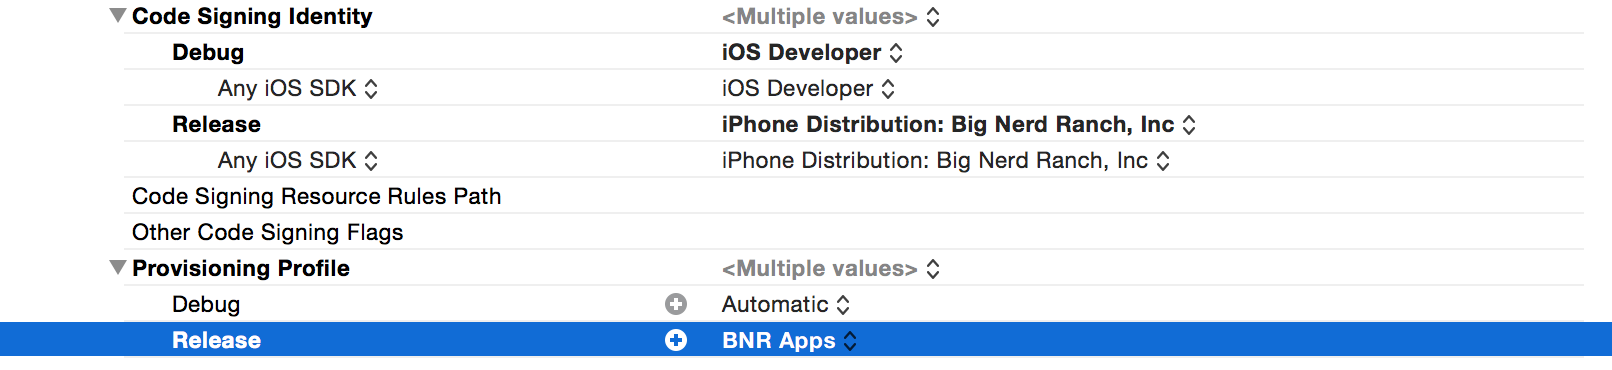
The first part is to set the right credentials for the ‘Release’ configuration set on your XCode Project. Go to your Project Settings -> Build Settings -> Code Signing and set the profile you are providing Travis to sign your app for the ‘Release’ configuration. In a bug free world, we wouldn’t have to do this, but unfortunately there’s a little glitch we have to work around.
As of writing this, Xcode 6.3.2 is the latest version, and the signing process is undergoing some changes. Some signing process options are in transition, which is why we also need to adjust another option to ensure the code signing succeeds.
That said, we need to change the value for the ‘Code Signing Resource Rules Path’ option to be ‘$(SDKROOT)/ResourceRules.plist’. That’s something you normally shouldn’t have to do, we just do it here to avoid getting problems with xcrun.
You can now push your changes to GitHub and check if everything works.
As before in Part 1, you can find a version of what we introduced here in our repo. The ’local-signing’ version is a bit more advanced than what we covered here, but similar in nature.
Coming Up
In the next and last part of this series we’re going to cover how to make use of your signed application bundles and upload them to HockeyApp. Stay tuned for the third part!